Authentication Integration
Learn how to effortlessly integrate the HyperID authentication flow into your application for secure and efficient authentication
In this chapter, we will guide you through the seamless integration of the HyperID authentication flow into your application with minimal effort and just a few lines of provided source code.
A source code example of the authentication flow is available on GitHub:
For this quick start guide, it is assumed that you are developing an application with a backend. Your goal is to obtain the user's wallet address after authentication, and you want to give the user the flexibility to choose from various authentication methods, such as a Web3 wallet, popular social media accounts, the HyperID Authenticator app, or a simple email/password login.
Please refer to our full documentation for complete details on all available authentication flows, detailed parameter descriptions, and more.
Flow Overview
The following are the keys steps in the HyperID authentication flow:
User Interaction: In this step, your application redirects the user to the HyperID authentication URI, where the user can choose among multiple available authentication methods. This step ensures that the user explicitly authorizes your application.
Exchanging Authorization Code for Tokens: Once the user approves the request, the authentication server sends back an authorization code to redirect URI. This code is short-lived and intended for a one-time exchange for access and refresh tokens. Your application will make a request to the HyperID to exchange this code for tokens.
Parsing Access Token: Once you have the access token (which is in the from of a JSON Web Token - JWT), you will need to parse it to retrieve the specific user information you're interested in, such as the wallet address.
Redirecting Users to the Authentication URI
HyperID provides both production and sandbox infrastructures, accessible via the following URIs:
When initiating an authentication request, it should include the 'client_id' and 'redirect_uri' parameters that you configured when registering of your application. Setting 'response_type' to 'code' indicates that your application is requesting an authorization code that will be exchanged for an access token in the next step. Additionally, to indicate that we want to retrieve the user's wallet address after authentication, we set 'flow_mode' to '4'.
This configuration results in the final redirect URI as outlined below:
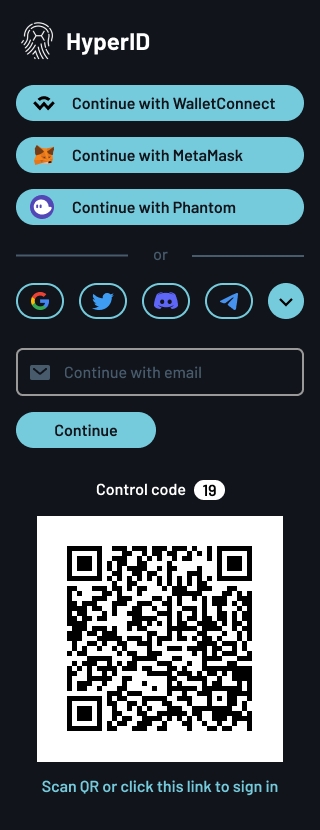
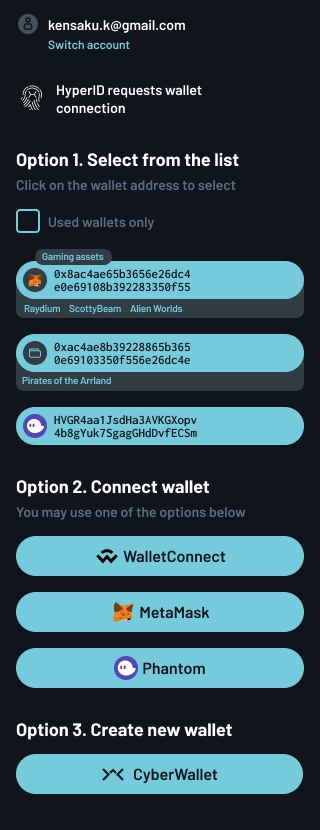
The user will be directed to the HyperID authentication page with a variety of options to choose from, including a Web3 wallet, various social media accounts, the HyperID Authenticator app, or a simple email/password login. Once authenticated, the user will be prompted to either create a wallet or provide an existing wallet.
HyperID will respond with an authorization result and code upon user authentication:
Exchanging Authorization Code for Tokens
This step is required to secure the authentication process and should be performed by your application's backend for enhanced security.
The code should be retrieved from the response of the previous step, while the redirect_uri, client_id and client_secret are obtained from the configuration settings of your client.
To illustrate, the following examples of requests and responses:
Parsing Access Token
The access token is presented in the form of a JSON Web Token (JWT), which is widely used. JWTs consist of three parts: header, payload, and signature. To retrieve the user's wallet address, you will primarily focus on the payload part of the JWT.
Most programming languages and frameworks provide libraries to decode JWT. Once decoded, you can access the payload, which is typically presented as a JSON object. Simply look for the 'wallet_address' and 'wallet_chain_id', which store the user's wallet and blockchain ID.
You can use any online JWT parser to explore the contents of your token (for example, https://jwt.io/).
Further Advancements
We've explored a simplified example of the HyperID authentication flow.
However, HyperID offers a wealth of customization options and different authentication flows to address different use cases.
HyperID allows you to customize the authentication flow to meet your specific needs. For instance, by changing the flow mode parameter to 3 (wallet_get_mode=3) in the example above, users will be required to prove ownership of their wallet, rather than just providing a public key.
We offer a number of different authentication flows to suit different scenarios. For example, if you change the flow mode parameter in the above example to 0 (flow_mode=0), users will be directed to default authentication flow, which doesn't require a user wallet at all. Some other popular flows serve to seamlessly create wallets for web2 users or vice versa to create web2 accounts for web3 users.
--
These are just a few examples of the versatility and flexibility of HyperID. For a detailed understanding of all available customization options and authentication flows, please refer to our complete documentation.
Last updated